Your Wady Central account starts empty, ready for your kitchen. You set it up in six steps: sign in, bring in your ingredients and recipes, check each recipe, choose what your outlets can order, enter your opening stock and start your first day. Once that is done, Wady Central costs every dish on your own prices and records every stock movement from day one. Each step below names the buttons you press.
Key takeaways
Your account starts empty, and you set it up on two pages: Recipes and Stock.
The quickest start is Import costing sheet, which brings in your ingredients and recipes together.
The first count of each item becomes its opening balance.
Nothing is locked: you can edit a recipe any time, and a new count corrects a wrong one.
What do you need before you start?
Have four lists ready. Your recipe costs, production plans and stock counts all start from them.
Your ingredients. For each one: the pack you buy (for example, a 10 kg sack), what it costs, and how much of it you lose to cleaning and trim. Wady Central costs each ingredient on what is usable after trim.
Your recipes. What goes into each one, how much, and how many portions a batch makes. Add the menu price for the dishes you sell.
Your outlet packs. What each outlet orders from you, and in which pack (for example, a tray of 24 portions). Skip this list if you don't supply outlets.
A count of your shelves on the day you start.
ℹ️ Tip: If your ingredients and recipes already sit in a costing spreadsheet, keep it open. You can import it in step 2.
How do you set up your Wady Central account?
Step 1: Sign in and find your way around
Sign in to Wady Central in any browser, on a laptop or tablet. The sidebar on the left lists eight pages under Kitchen: Orders, Daily Brief, Recipes, Production Plan, Stock, Dispatch, Reports and Control.
Setup happens on two of them, Recipes and Stock. The others fill up once you start working. The interface is in English, so the guide writes each button the way it appears on screen.
You're done when you can see the eight pages in the sidebar.
Step 2: Bring in your ingredients and recipes
Open Recipes. You can fill it in two ways.
Option A: import your costing sheet. This is the quickest way if your costing lives in a spreadsheet.
Put your ingredients and recipes on one sheet. Spell each ingredient the same way everywhere it appears. Save the sheet as CSV, or copy the cells.
Click Import costing sheet, the green button at the top right.
Add the file, or paste the cells.
Read the preview. INGREDIENTS and RECIPES show what it found. SKIPPED shows the rows it can't use.
Click Import recipes. If rows were skipped, tick Skip unusable rows first, or fix those rows in your sheet and add it again.
Full details are in how to import a costing sheet.
Option B: add recipes one at a time. Click New recipe and build each recipe as in step 3. If a recipe needs an ingredient that isn't in Wady Central yet, click + New ingredient in the same drawer.
You're done when the RECIPES and INGREDIENTS cards at the top of Recipes show your numbers.
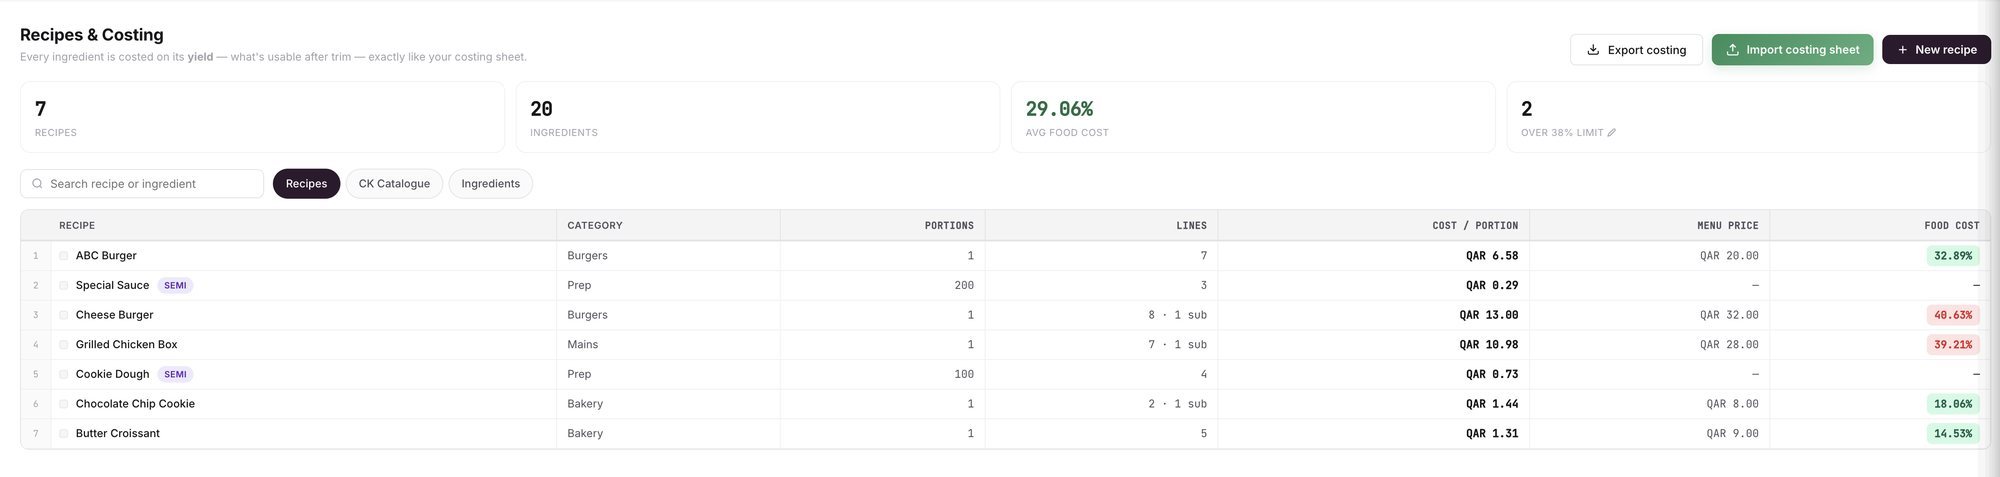
An example screen: the Recipes page, with Import costing sheet and New recipe at the top right.
Step 3: Build and check each recipe
Click New recipe for a new one. For an imported recipe, open it and click Edit. Then:
Fill in Name and Portions this batch makes. Both are required. Category and Chef are optional.
Under INGREDIENTS & SUB-RECIPES, click + Add line for each ingredient, pick it, and type the amount in USE. Its UNIT and COST show on the same line.
Add Recipe wastage, in grams, if the recipe loses weight in prep.
Add a Menu price for a dish you sell. The drawer shows the food cost percentage and the margin straight away.
Optional: set Min level and Par level, in portions. Stock shows them under MIN / PAR, and marks a dish BELOW MIN when it falls under its minimum.
Click Save recipe.
The cost updates as you add each line, because Wady Central costs every ingredient on what is usable after trim. See how to cost a recipe with yield and trim loss.
Sauces, doughs and other prep. Tick Semi-finished and save. Then add it as a line inside every recipe that uses it, the same way you add an ingredient.
After an import, open a few recipes and compare the cost per portion with your sheet.
You're done when each recipe's cost per portion matches your sheet.
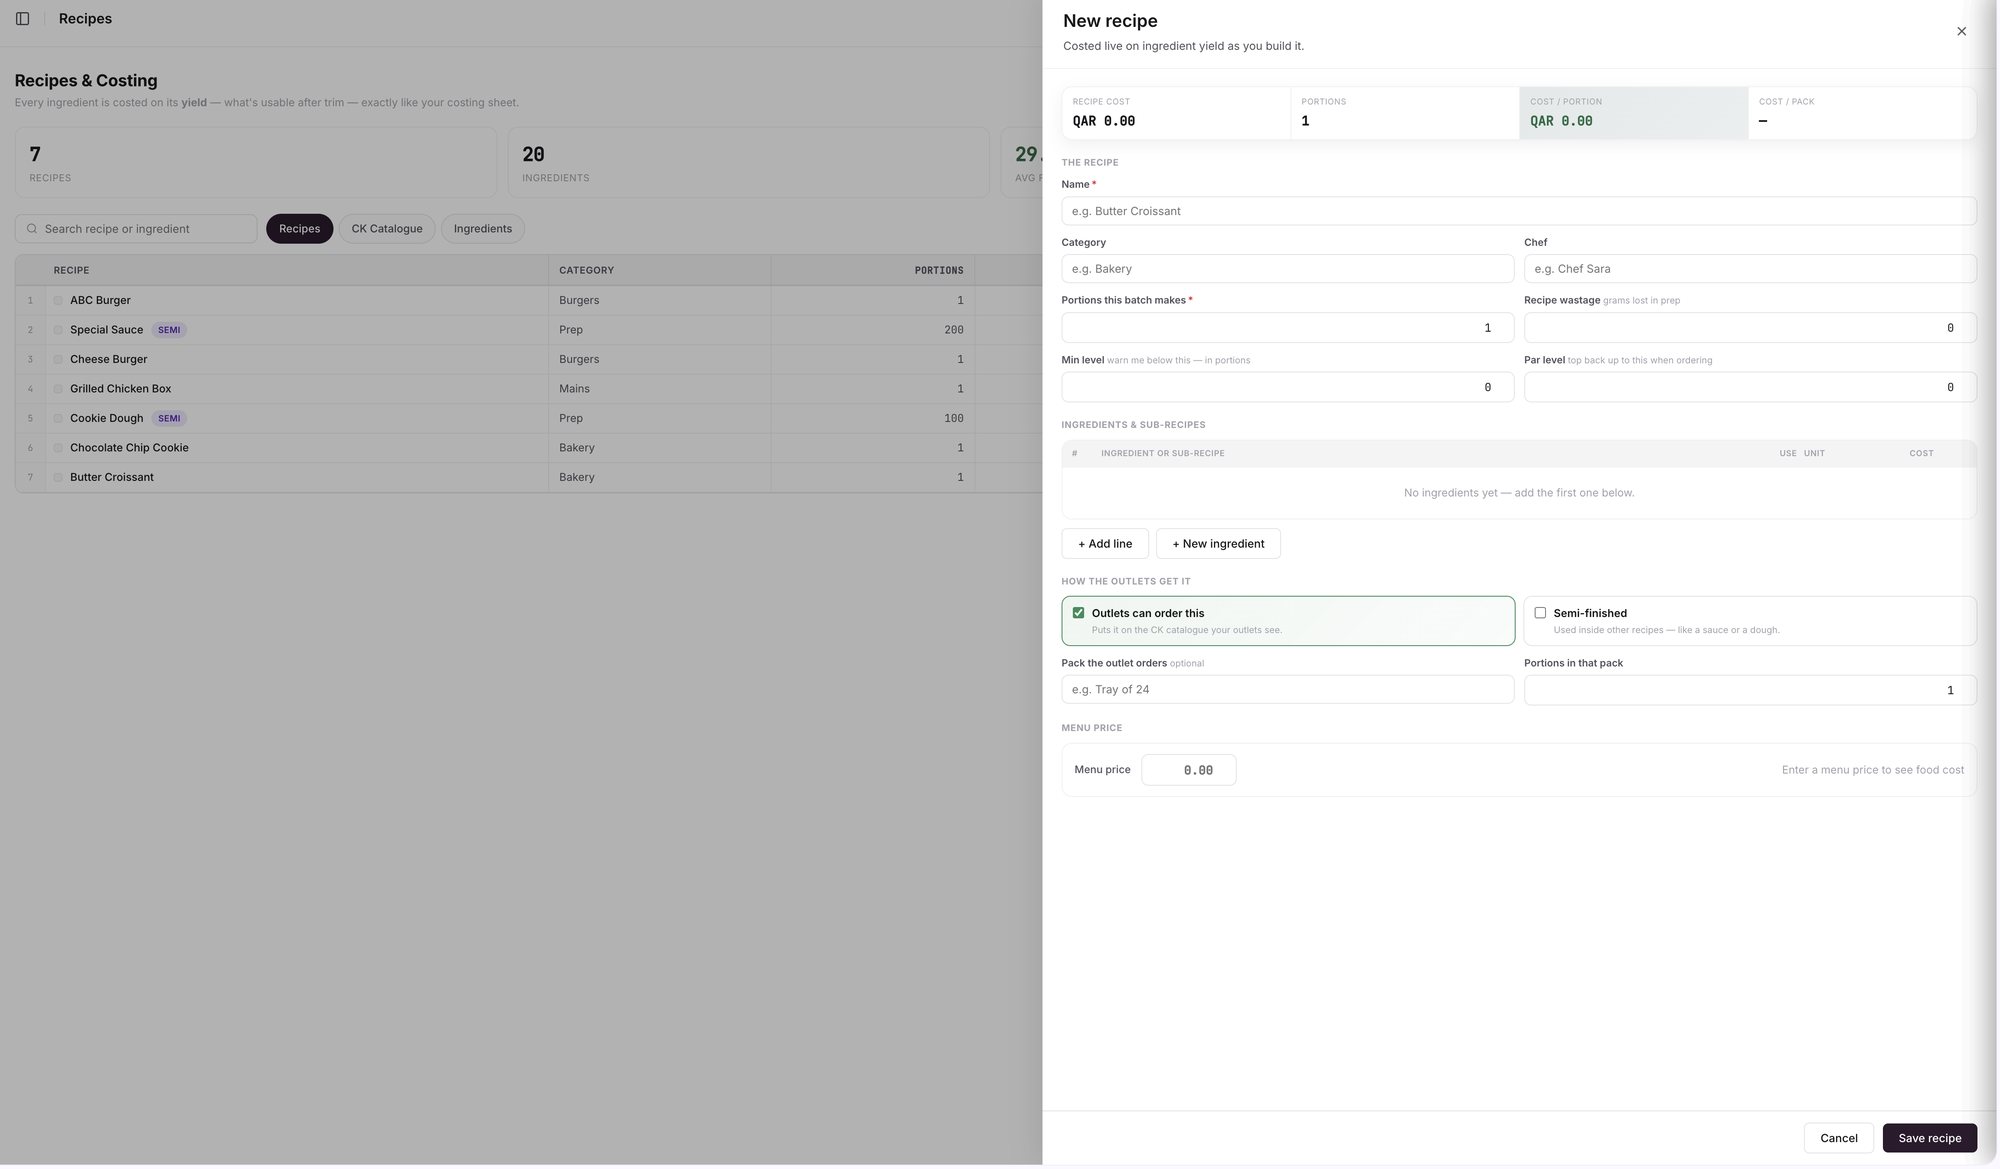
An example screen: a new recipe, before any ingredient lines are added.
Step 4: Choose what your outlets can order
Skip this step if your kitchen doesn't supply outlets.
Every recipe has a section called HOW THE OUTLETS GET IT. Open the recipe, click Edit, and then:
Tick Outlets can order this. It puts the recipe on the CK catalogue your outlets see. New recipes come with it ticked.
In Pack the outlet orders, name the pack, for example Tray of 24.
In Portions in that pack, type how many portions the pack holds.
Click Save recipe. The drawer then shows the cost per pack.
ℹ️ Tip: Untick Outlets can order this for anything your outlets shouldn't order, such as a sauce you only use inside other dishes. To check the full list, open the CK Catalogue view on the Recipes page.
You're done when every dish your outlets order has its pack.
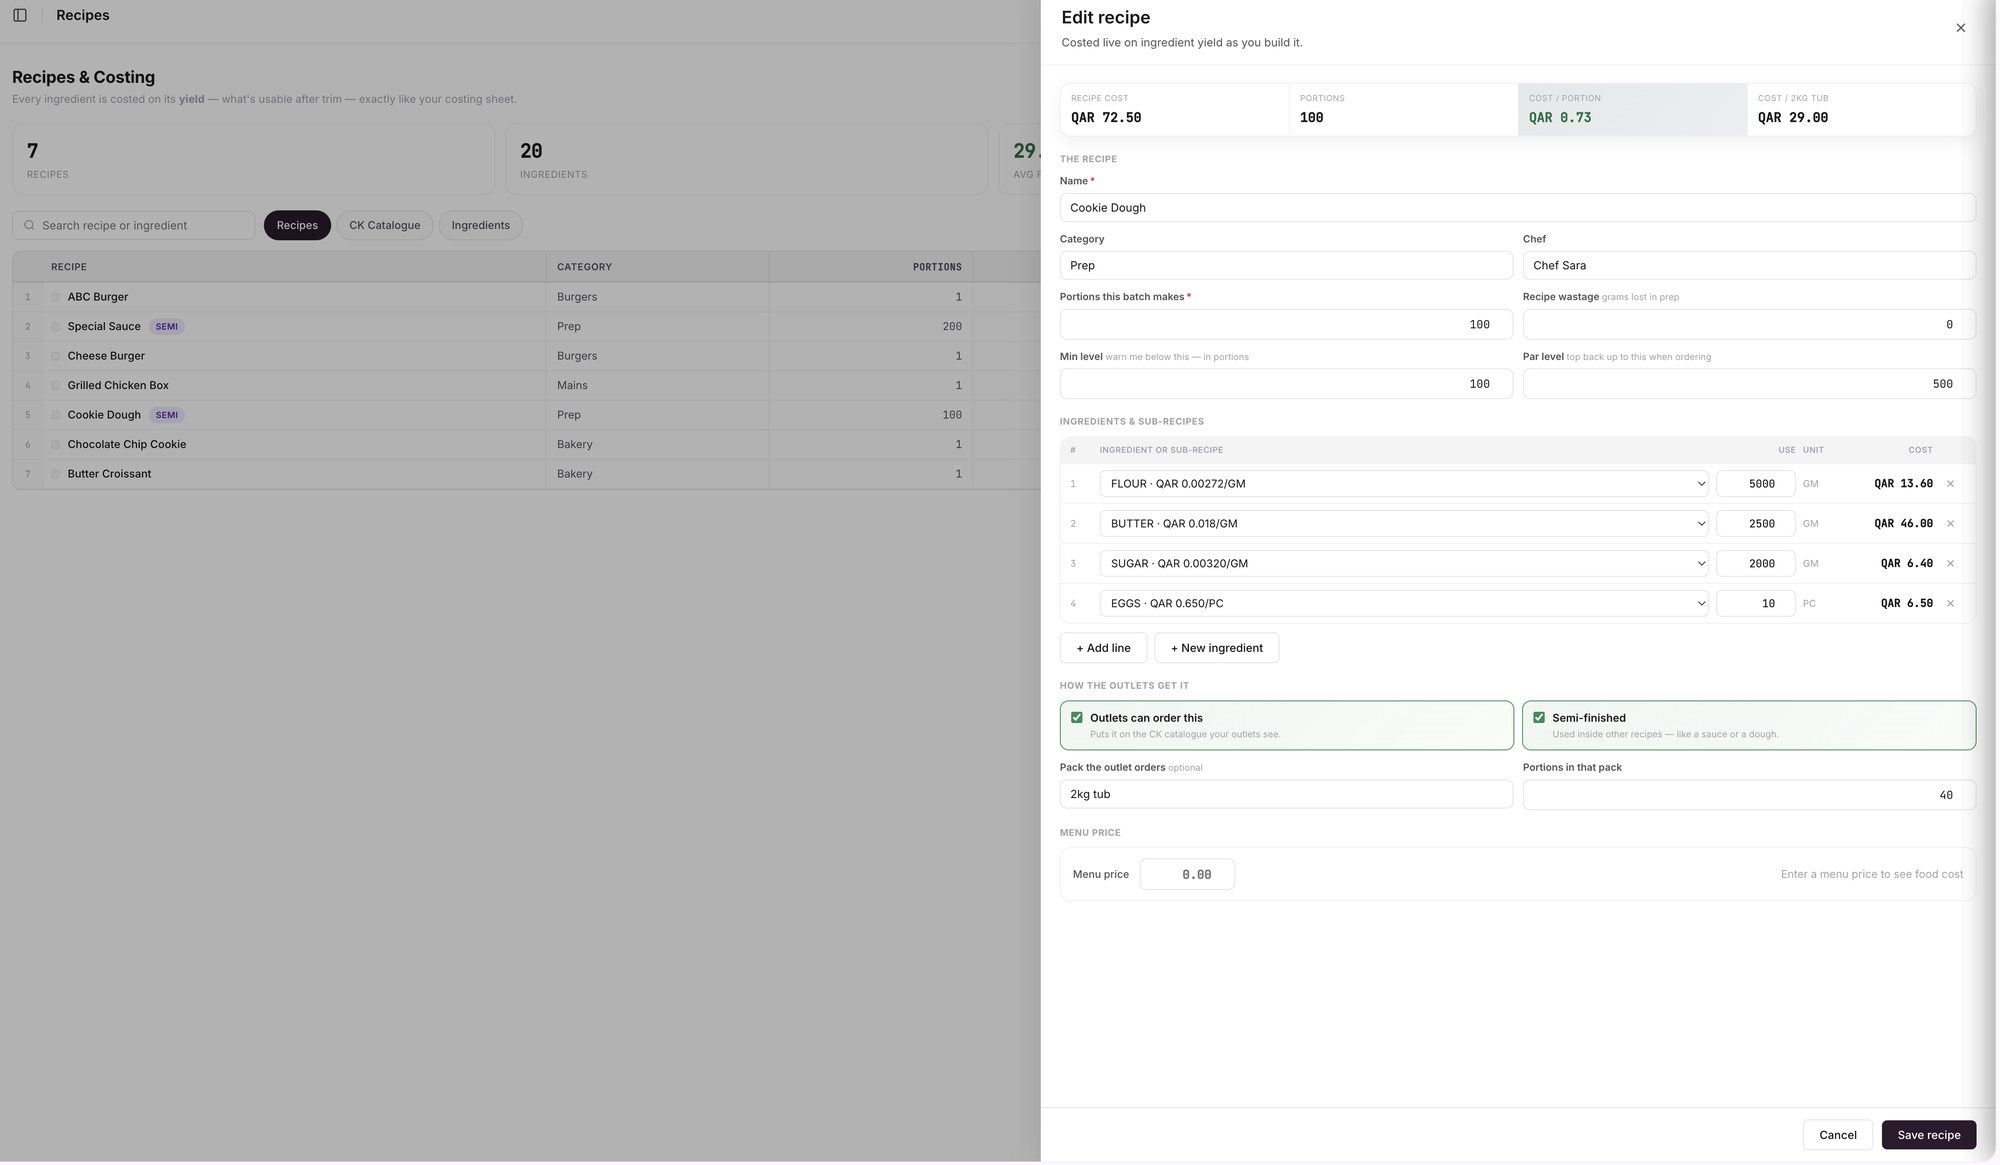
An example screen: a recipe offered to the outlets in a named pack, with its cost per pack.
Step 5: Enter your opening stock
Your opening stock is your first count: what is on your shelves on day one. Stock already lists every ingredient and recipe you added, with BOUGHT on what you buy and MADE on what you make.
Open Stock and click the Count stock tab.
Click Download count sheet to print a sheet of every item, or count straight on screen.
Count your shelves in packs and loose units, the way things sit on the shelf. On screen, type them into PACKS and LOOSE. If you counted on paper, click Paste / upload.
Leave an item blank if you didn't count it. Type 0 only if you counted it and there is none.
Click Review variance and check the lines. Wady Central writes nothing until you post.
Click the dark button at the bottom, which names how many lines will move.
The first count of each item becomes its opening balance. For counting tips, see how to run a stock count.
You're done when the On hand tab shows your STOCK VALUE.
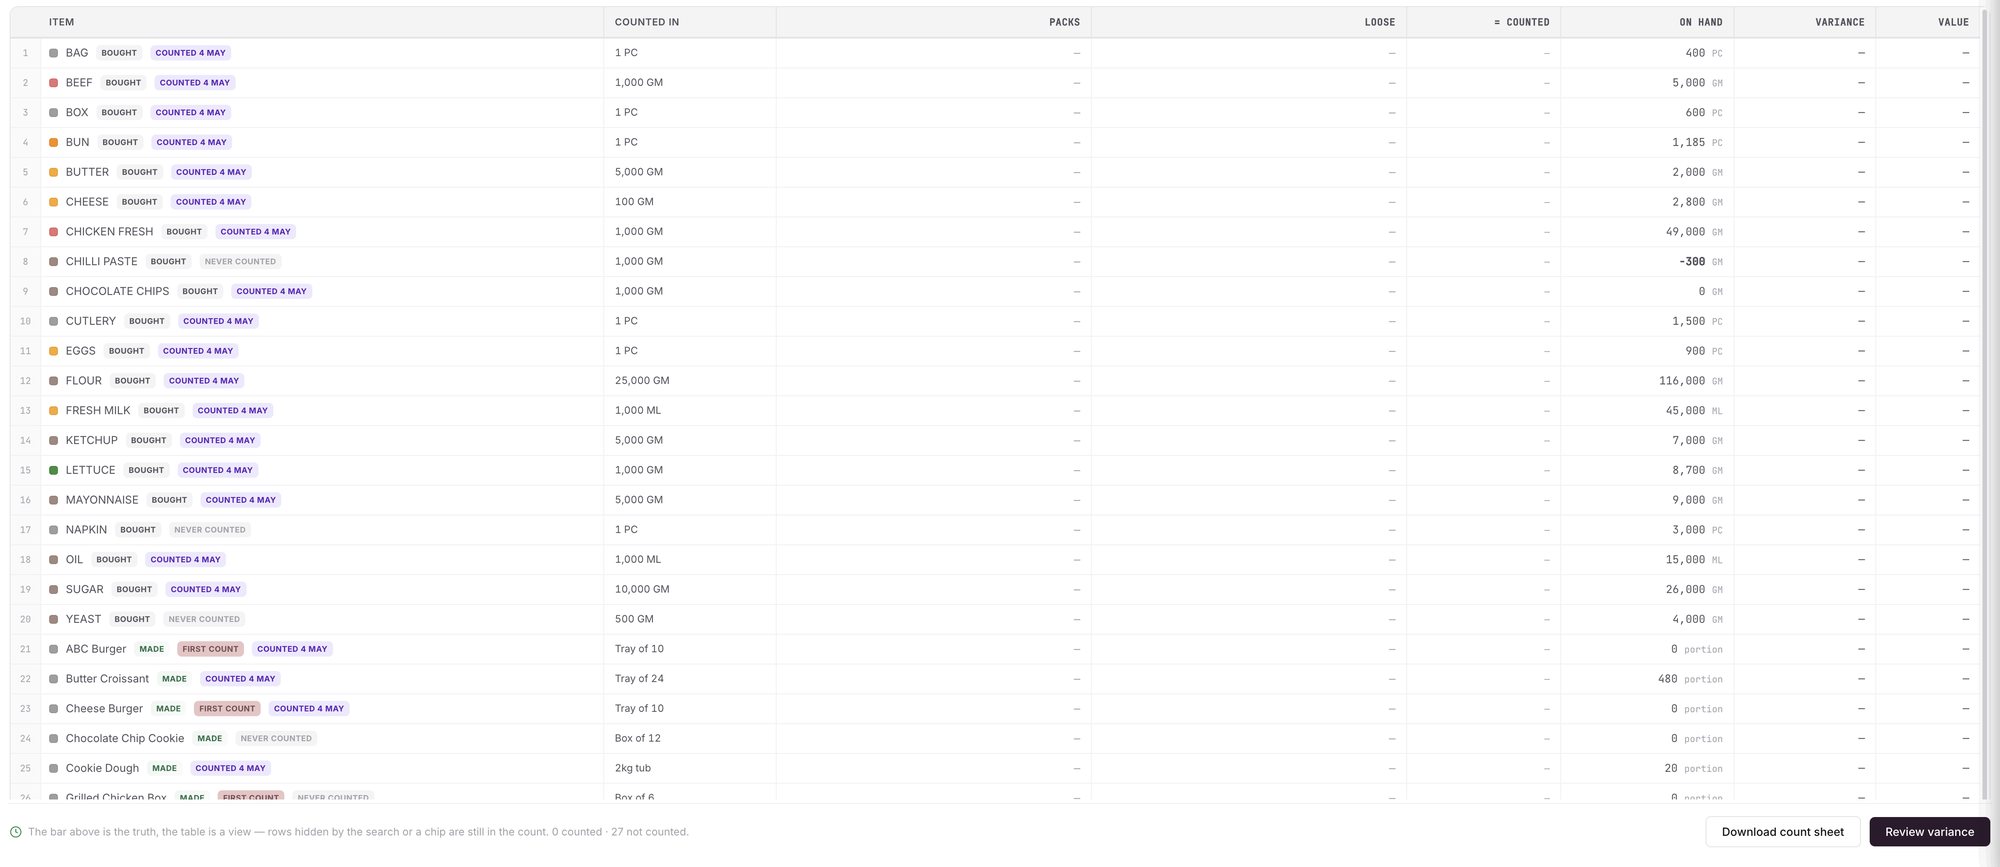
An example screen: the count sheet, before any counts are entered.
Step 6: Start your first day
Your kitchen is set up. On your first day you start using the other pages:
Deliveries. Orders you place through Wady arrive pre-filled under Stock, on the Receive tab, in the Expected list. Check what turned up and click Post receipt. The first time a supplier's pack arrives, Wady Central asks what it holds in your kitchen. You answer once, and it remembers. For a delivery that didn't come through Wady, click Receive without an order. See how to receive a supplier delivery.
Outlet orders. Your outlets order from your kitchen in the Wady app, and each order lands on Orders. See how to plan daily production from outlet orders.
Every morning. Open Daily Brief to see what looks wrong and what changed. See the Daily Brief.
You're done when your first delivery is posted. From then on, your daily work keeps every page up to date.
Stuck on a step? Message us on WhatsApp at +974 7000 7658 or email wecare@thewady.com.
Related guides
Frequently asked questions
Did this guide answer your question?
Didn't find your answer?
Message us on WhatsApp or by email, and our team will get back to you.
Your kitchen's stock, recipes and costing, with numbers from real records.

